

How To Make Text Two Colors In Photoshop

How to Create Divide Colour Text in Photoshop
Larn how easy information technology is to fill the top and bottom half of your text with dissimilar colors in Photoshop using gradients, and how to employ the same split up-color gradient to a stroke or to the background!
In this tutorial, I show you how to create split-color, or one-half-color text in Photoshop where the top half of each letter is filled with one color and the lesser half is filled with a different color. In that location are several means to create this upshot, but the best style (and the mode we'll be learning here) is by using a slope.
Usually we think of gradients that gradually transition from one color to the adjacent. But in Photoshop, we tin also create solid color gradients that carve up the colors downwardly the eye. And the benefit to creating this effect with a slope is that nosotros tin save and reuse the gradient to raise the effect fifty-fifty farther.
For example, we'll kickoff past learning how to create the split-color gradient itself and how to apply it to the text:
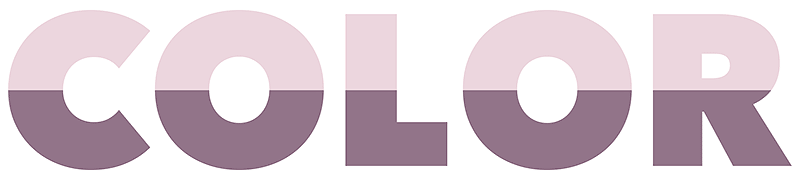
The bones effect.
Then we'll look at two different ways to raise the consequence. First, I'll show y'all how to utilise the separate-colour slope to a stroke around the letters:

The split-colour text and stroke effect.
And finally, y'all'll larn how to add together the split-color gradient to the background so that the text and the groundwork colors mirror each other:
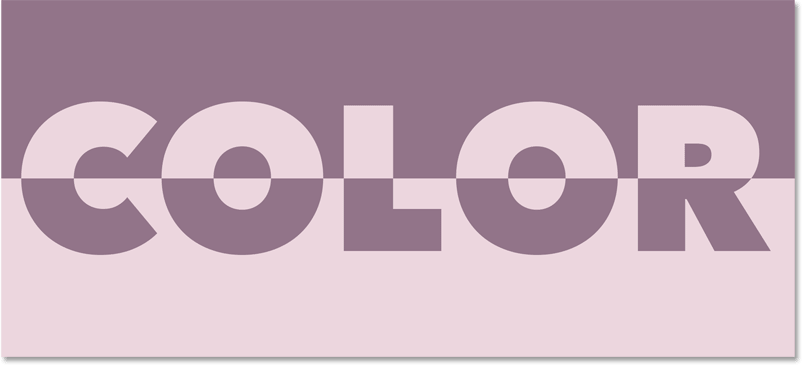
The split-color text and groundwork event.
You tin can follow forth with any recent version of Photoshop. Merely for all-time results, you'll desire to be using Photoshop 2020 or later.
Let'south get started!
The document setup
To salve time, I've created a new Photoshop certificate with a white groundwork, and I've added some text on a type layer above information technology. The font I'm using is Avenir Next Heavy but any font will work. And the color of the text doesn't affair because we'll be replacing the colour with our gradient:
The initial Photoshop document.
Step 1: Add a Slope Overlay effect to the text
To add a slope to the text, nosotros'll use a Gradient Overlay layer effect.
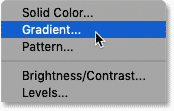
In the Layers panel, make certain your type layer is selected. Then click the fx icon at the bottom:
Clicking the Layer Effects icon.
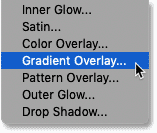
And choose Slope Overlay from the listing:
Adding a Gradient Overlay to the text.
Stride 2: Choose the Black, White slope
The Layer Style dialog box opens to the Gradient Overlay options. We'll showtime past choosing Photoshop's standard blackness to white slope, and and so we'll edit the colors to create our own custom slope:
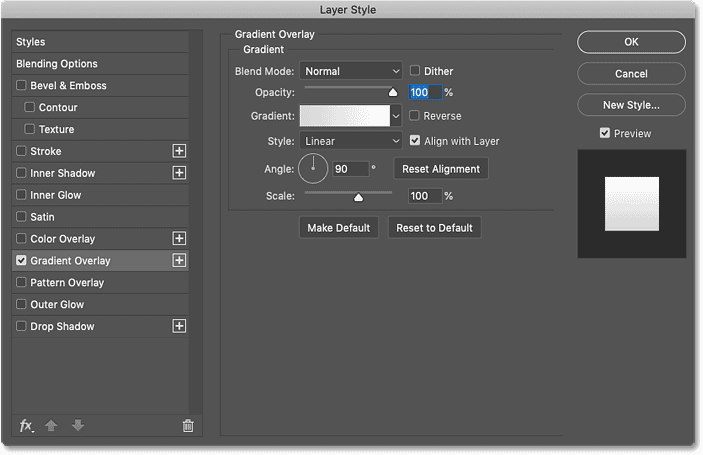
The Layer Fashion dialog box.
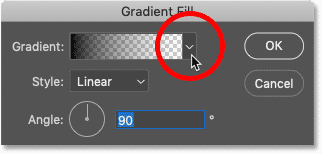
To choose a gradient, click on the current gradient's color swatch. Make sure you click the color swatch itself, non the pocket-sized arrow to the right of the swatch:
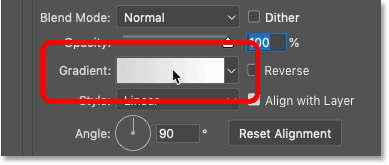
Clicking the gradient swatch.
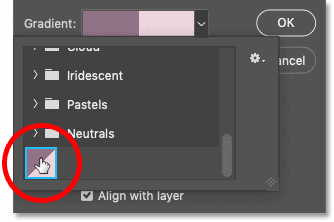
Then in the Gradient Editor, cull the Black, White gradient from the Presets department at the peak. As of Photoshop CC 2020, slope presets are grouped into folders and the Black, White slope is plant in the Nuts folder:
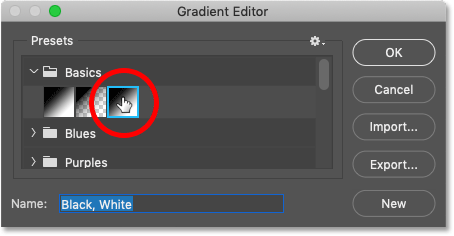
Choosing the Black, White slope.
Footstep 3: Edit the gradient colors
The gradient preview bar in the lesser half of the dialog box shows the current gradient colors. And with the Black, White gradient selected, the left side of the preview bar appears black and the right side appears white. Simply nosotros can edit the colors using the color stops.
To change the color black to something else, double-click on the black color finish below the left side of the preview bar:
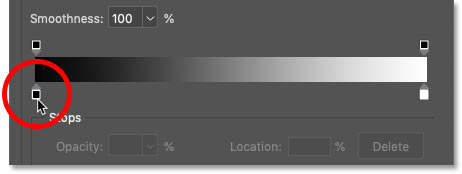
Double-clicking on the blackness color stop to modify the color.
And and then cull a new color from Photoshop's Color Picker. You can apply any colors you like. I'll choose a muted pink past setting the R (Red) value to 146, the One thousand (Green) value to 116 and the B (Blue) value to 137. Click OK to shut the Color Picker when you're done:
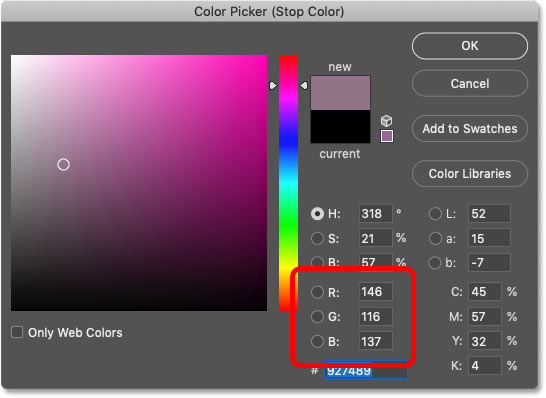
Replacing black with a new colour from the Color Picker.
So to change the color white to something else, double-click on the white color stop below the right side of the preview bar:
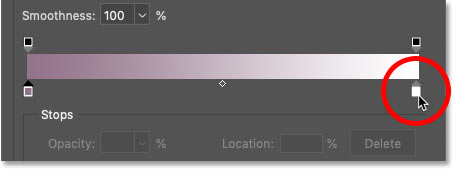
Double-clicking on the white color stop to alter the color.
And choose a new color from the Color Picker. This time, I'll go with a lighter reddish pinkish by setting R to 237, One thousand to 214 and B to 222. Click OK when you're done:
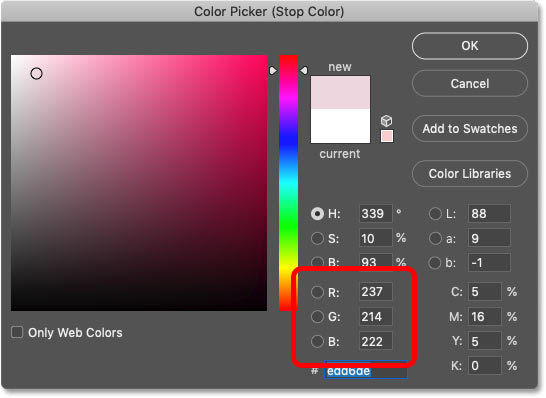
Replacing white with a new color from the Color Picker.
After editing both colors, we at present have a new custom gradient:
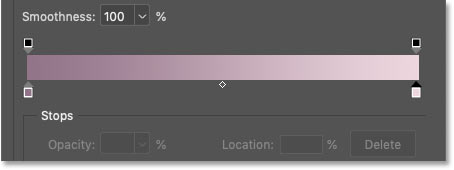
The new slope colors.
Related: Create a rainbow gradient in Photoshop!
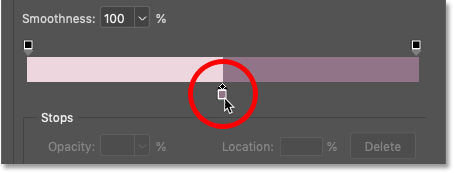
Stride 4: Set up the Location of each color to 50%
At the moment, the colors in the gradient gradually transition from one to the other. To create a solid color gradient that splits the 2 colors down the eye, but change the Location value for each of the colour stops.
First, click on the left colour terminate to select it. Don't double-click this time, just click once:
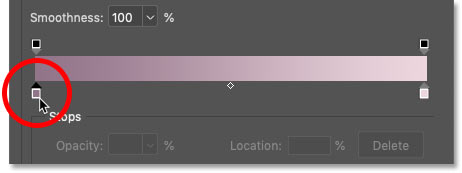
Selecting the left color terminate.
And and so change its Location value from 0% to 50%. The colour stop volition move below the center of the gradient:
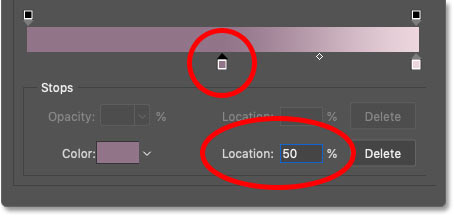
Changing the Location of the left color to 50%.
Then click on the correct colour cease to select it:
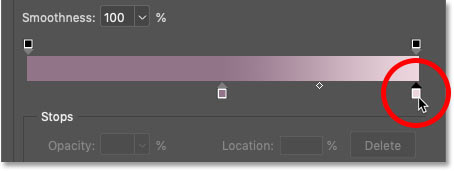
Selecting the right colour stop.
And change its Location value besides to fifty%. The two color stops now overlap in the center and each one-half of the gradient is filled with a solid color:
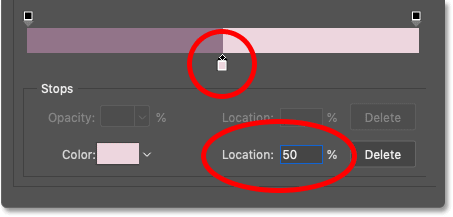
Changing the Location of the right color to l%.
How to swap the social club of the colors
Depending on the gild in which you lot selected the color stops, the colors in your gradient may have switched sides. To switch them back, simply click on whichever color cease is visible below the center of the preview bar:
Click the color stop to swap the order of the colors.
Pace 5: Save your gradient as a new preset
If you want to use the slope non merely to your text but also to a stroke or to the background (which nosotros'll practise in a moment), then before closing the Gradient Editor, save the gradient every bit a new preset.
But first, if you're using Photoshop CC 2020 or after, close the Basics folder in the Presets surface area. Leaving the folder open will cause the new preset to exist added to the binder, which is not what we want:
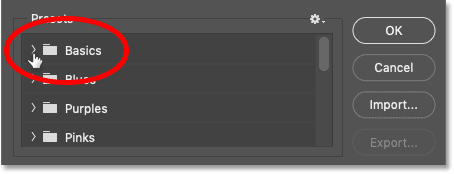
Closing the Basics folder earlier saving the new preset.
Give your preset a proper name. I'll name mine "Split colors". And then click the New button to salve it:
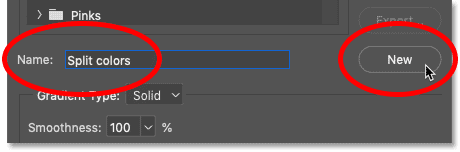
Naming and saving the new preset.
The new preset appears as a thumbnail below the other gradients. At this bespeak, we're done with the Gradient Editor and so click OK to close it. But get out the Layer Way dialog box open:
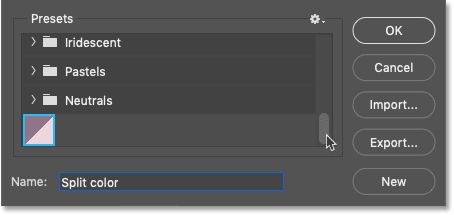
The slope has been saved as a custom preset.
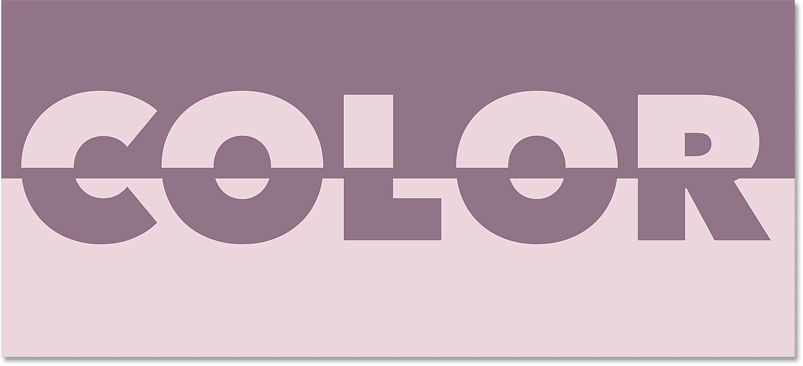
Here's my split-color text so far. The top half is filled with the lighter of the 2 colors and the bottom half is filled with the darker color:
The upshot afterward filling the text with the dissever-color gradient.
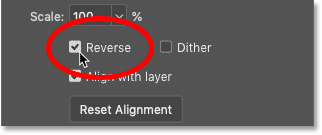
How to reverse the colors
To swap the position of the colors, select the Reverse option in the Layer Style dialog box:
Checking the Reverse option.
And now the darker color is on superlative and the lighter color is on the bottom. Uncheck the Reverse selection to bandy them back:

The same colors just with the gild reversed.
How to apply a separate-color stroke around the text
If you lot're happy with the effect at this betoken, yous can close the Layer Style dialog box and you're done. Just here'southward how you can raise the effect past applying a stroke around the text using the aforementioned split-colour gradient.
Step one: Add a Stroke layer effect
All the same in the Layer Style dialog box, click on the discussion Stroke in the list of furnishings along the left:
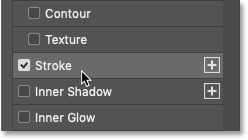
Adding a Stroke layer effect.
Step 2: Select your split-colour gradient
Change the stroke's Fill Type from Color to Slope:

Setting the Fill up Type to Slope.
So click the small pointer next to the gradient swatch:
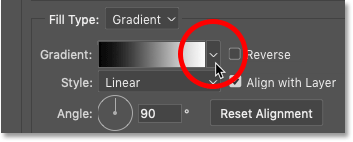
Clicking the pointer to choose a new slope.
And double-click on your split-color gradient's thumbnail to select it:
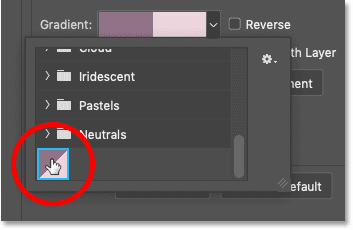
Double-clicking to select the gradient preset.
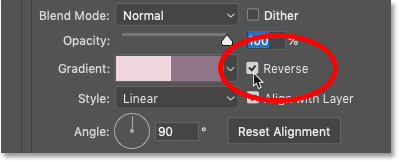
Pace iii: Select the Reverse option
To run across the stroke around the text, we demand the gradient colors to exist in the reverse guild from how they appear in the text itself. So if y'all did not select the Reverse selection for the Gradient Overlay effect, then select Opposite in the Stroke options. Or if you lot did select Reverse for the Gradient Overlay, leave Opposite unchecked for the stroke.
In other words, any you did with the Contrary selection for the text itself (the Gradient Overlay), do the opposite for the stroke:

Reversing the club of the gradient colors in the stroke.
The stroke should now announced as a thin outline effectually the messages, and the colors in the stroke should be in the contrary order of the text. The dark half of the stroke should appear around the lighter half of the text, and the lighter half of the stroke should be around the darker half of the text:

The initial stroke around the letters.
Step 4: Set the Position to Outside
Change the stroke's Position to Exterior and then information technology appears around the outside edges of the letters:

Setting the stroke's position to Outside.
Step 5: Increase the Size of the stroke
So apply the Size slider to increment the stroke's width. I'll set mine to 16px:
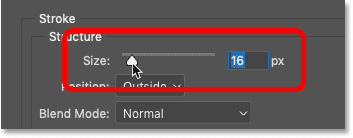
Increasing the stroke size.
And here's the issue. We at present take a stroke around the text using the same (but reversed) split-color issue:
The divide-color stroke effect.
Step 6: Shut the Layer Manner dialog box
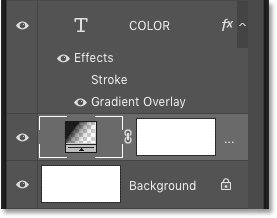
Up next, I'll bear witness you how to fill up the groundwork with your carve up-colour gradient. But at this point, we're washed with the Layer Fashion dialog box and so click OK to shut information technology:
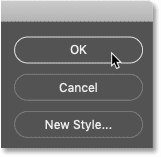
Closing the Layer Fashion dialog box.
Related: How to add together multiple strokes around your text!
How to fill the background with the split up-color slope
Instead of calculation a stroke around the text, what if you want to make full the groundwork behind the text with your split-colour gradient, so that the colors in the background and in the text mirror each other? Here'due south how to practice it.
Stride 1: Turn off the Stroke effect
Start, if you added a stroke from the previous section, so in the Layers panel, plough off the stroke by clicking its visibility icon below the type layer:
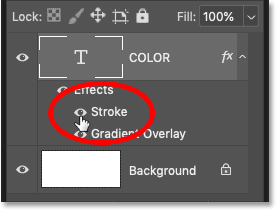
Turning off the stroke.
Footstep ii: Select the Groundwork layer
Yet in the Layers panel, click on the Background layer to select it:
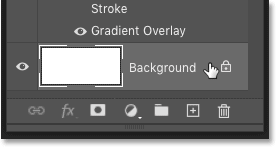
Selecting the Background layer.
Step 3: Add a Slope Fill layer
Then click the New Fill up or Adjustment Layer icon at the bottom:
Clicking the New Make full or Adjustment Layer icon.
And choose a Gradient fill layer from the list:
Adding a Slope fill layer.
The Slope fill layer appears between the type layer and the Groundwork layer:
The Gradient fill layer is added beneath the text.
Step four: Cull the split-color slope
In the Slope Fill dialog box, click the arrow to the right of the gradient swatch:
Clicking the arrow to choose a unlike slope.
And and so double-click on the split-color gradient's thumbnail to select it:
Double-clicking on the separate-color gradient preset.
Step 5: Contrary the gradient colors
But like with the stroke, the colors for the background demand to be in the contrary guild of the text, otherwise the text will disappear from view.
Then if you lot did non select the Reverse pick for the text (the Gradient Overlay upshot), then select Reverse in the Slope Fill dialog box. And if yous did select Reverse for the text, then exit Reverse in the Slope Fill dialog box unchecked:
Reversing the colors of the slope for the background.
Click OK to close the Gradient Fill dialog box, and the dissever-color gradient appears backside the text, in the reverse society of how it appears inside the letters.
The only problem, at to the lowest degree in my case, is that the slope in the text is not lined up with the gradient in the background. So I'll fix that next:
The text and the gradient need to exist aligned.
Step 6: Move the text into position
To move your text into position so the 2 gradients line up, start select the type layer in the Layers panel:

Selecting the blazon layer.
Then in the toolbar, select the Move Tool:
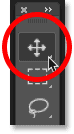
Choosing the Motility Tool.
And before moving the text, go upwardly to the View menu in the Carte du jour Bar and choose 100%. This zooms your certificate to the 100% view style which allows y'all to nudge the text i pixel at a time:
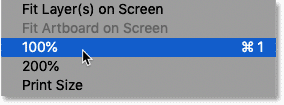
Going to View > 100%.
With the Move Tool selected and your view at 100%, use the Upwards or Down arrow cardinal on your keyboard to nudge the text into place. In my instance, I'll nudge the text downward ane pixel at a time until the horizontal split points of the gradient in the text and the gradient in the background are aligned:
The terminal split up-colour text and gradient outcome.
And there we have it! That's how to create split-colour text in Photoshop! For more text furnishings, see my complete list of Photoshop text furnishings tutorials. And don't forget, all of our tutorials are available to download as PDFs!
Other Stuff
© 2022 Photoshop Essentials.com.
For inspiration, not duplication.
Site design by Steve Patterson.
Photoshop is a trademark of Adobe Systems Inc.

How To Make Text Two Colors In Photoshop,
Source: https://www.photoshopessentials.com/photoshop-text/text-effects/how-to-create-split-color-text-in-photoshop/
Posted by: rineharttring1983.blogspot.com
0 Response to "How To Make Text Two Colors In Photoshop"
Post a Comment